

What. An. Adventure. This Sallie Tomato Duffle bag was! I’m being dramatic, but seriously there were moments I questioned all of my life decisions (don’t worry I’ll give all the tips so you can avoid the same fate).
That said.. I LOVE IT! It’s this giant bag (I could definitely fit my second kid in it.. not that I would try..).
And the video tutorial which you can find HERE, is key to success. I mean I truly would have been lost as a duffle bag newbie.

I partnered up with Missouri Star Quilt Co. for their birthday celebration this month, I wanted to make a fun bag to start the holiday season in style!
Here is a 15% off Missouri Star Quilt Co. discount for you - CLICK HERE, it's just good for the month of September (it is an affiliate link FYI).
I wanted to walk through some of the steps of the bag so you can avoid the pitfalls that plagued me when you’re making your own duffle bags!
So starting off, was cutting all the pieces which was actually very satisfying. Have you played with cork fabric yet? It’s magical.


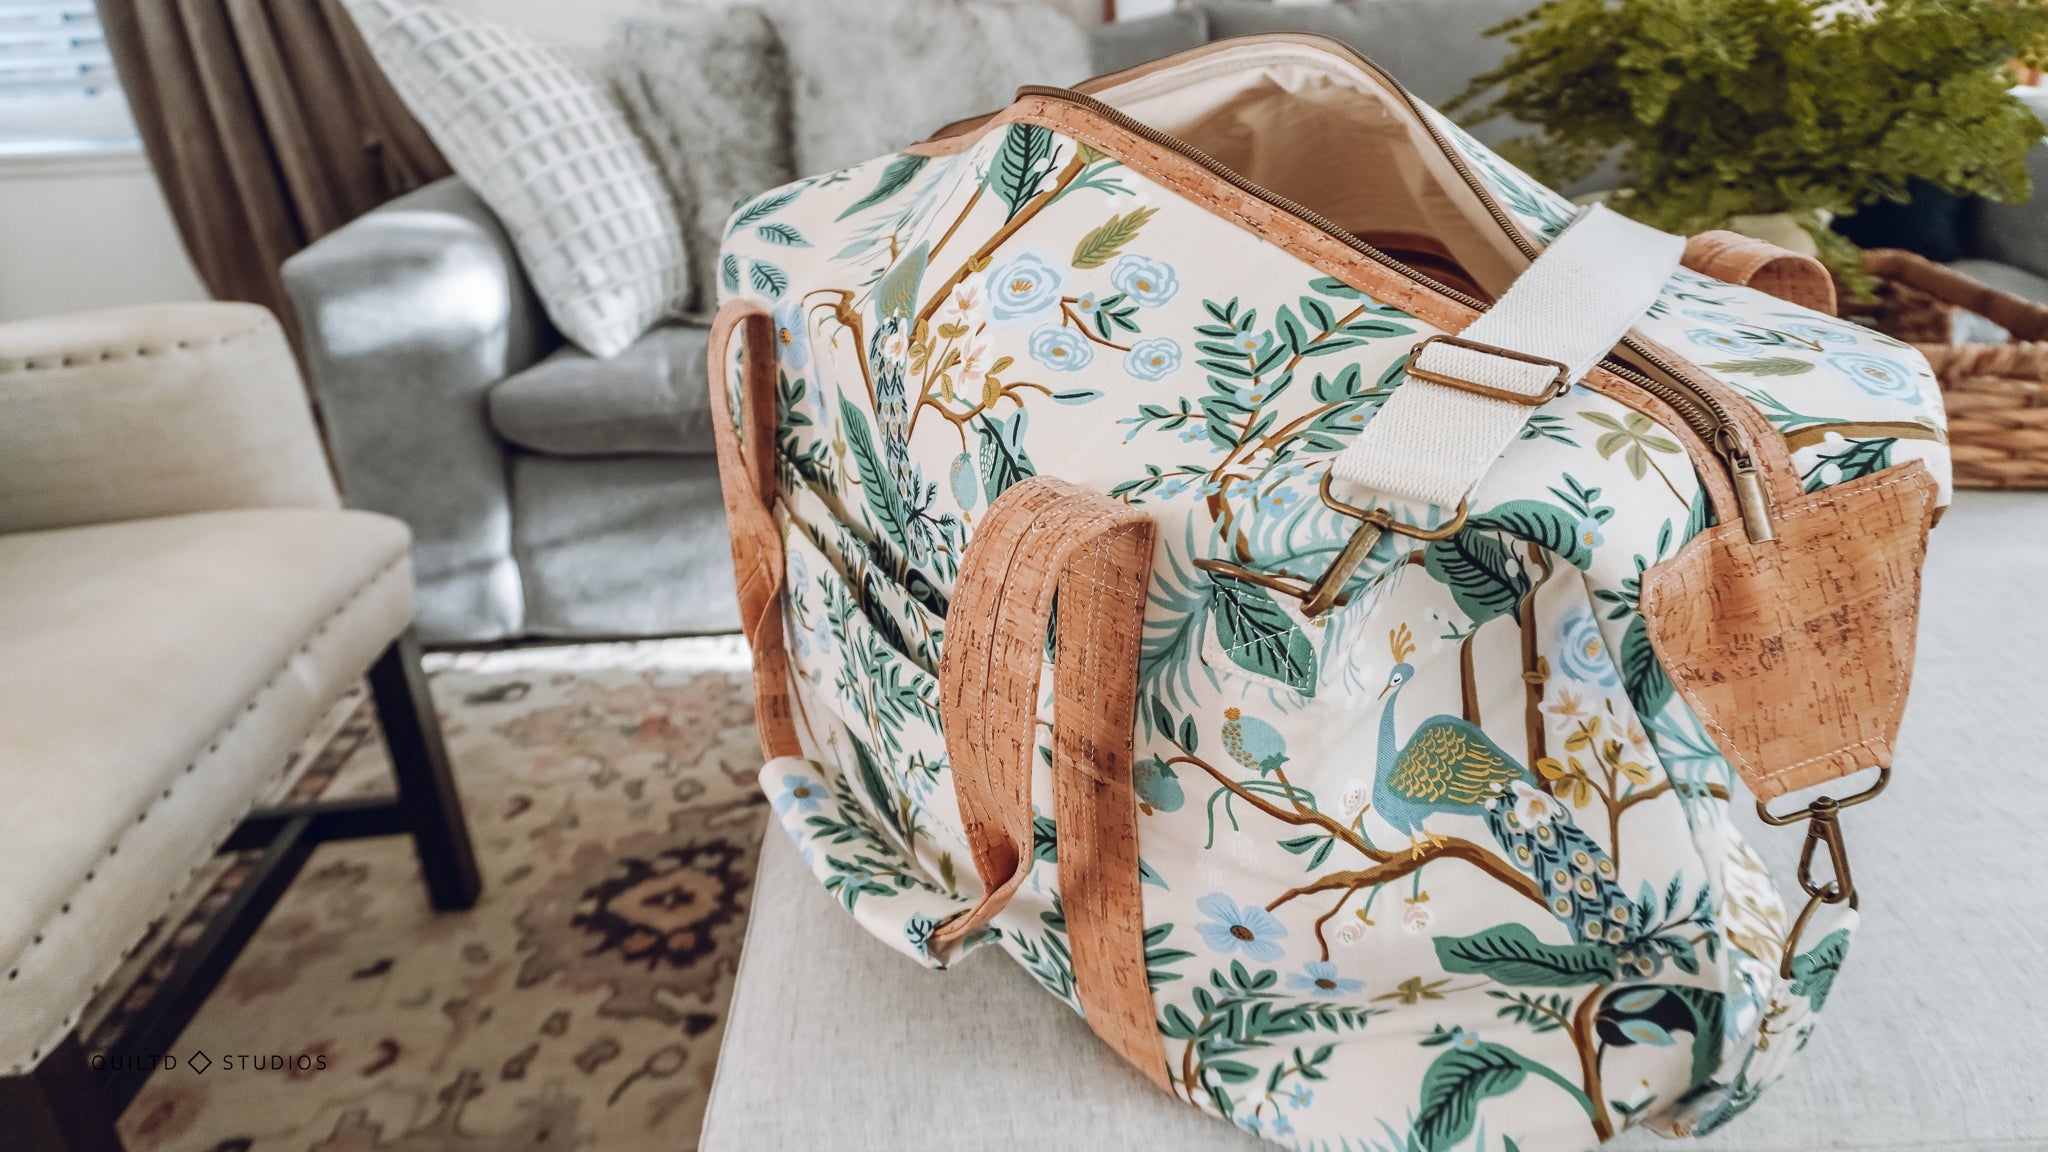
I used Rifle Paper Co. Vintage Garden Peacock Canvas fabric which I ordered from Stash Fabric and for the lining I used Coconut Milk from Art Gallery Fabrics.
TIP #1
Make sure you cut the prints in the right direction. I had to recut at least 3 pieces (so sad, I was looking forward to all that extra fabric!) because directionally I didn’t do it correctly.
So don’t be like me. Also make sure to label your pieces as you go, it’s easy to mix some of them up.
Once you’ve cut all the fabrics and applied the interfacing, I sewed together the base.


The base is probably the thickest thing I’ve sewn through and my Bernina 570QE did well, I think a fresh needle is key.
Putting in the feet was really fun, I don’t get to do that with quilts!
After the base is all sewn together, then I worked on the outside zipper pocket.

I was so worried my pocket would be off by a small margin but then I’d notice every time I looked at it, so I obsessively checked its location before sewing.
Sallie makes it look very easy, I suppose she’s made a few of these!

I can’t remember if its this pocket or just the main zipper where double sided tape comes up, but I’ll mention it here.
Tip #2
Don’t sew over the sticky tape. No seriously, this cost me at least 2 years of my life.
It’s really hard to pin some things so the tape is necessary, but try to apply it in locations you won’t be near sewing.

Save yourself the stress. You’ll be using the tape quite a bit, I ended up cutting up mine to be more narrow so that I could avoid it easier.
And yet… I still managed to get my needle covered in sticky goop which then threw off my stitching/machine. AWFUL.
That was of course after I accidentally sewed the wrong long pieces together for the long handles (sigh).


Tip #3
Double check all of the measurements before sewing.
This happened a few times but the worst was the handles, which I tried to unpick but ended up redoing (with BARELY enough cork left).
Just make sure to look at the pattern very closely and cut exactly to that.

After sewing on the handles we move onto some little outside doodads like the keyring things. Which I thought might stick out too much but really didn’t once sewn on.
At this point I was cursing the manufacturers of double sided sticky tape (waves fist at the sky) because it slowed me down so much.
Next it was time for zipper pockets on the lining which turned out so cute! The mesh moves a lot while sewing, so I’m not sure how Sallie get’s hers to stay so completely square?!

Either way, they turned out well with the cork (despite that cursed cork/tape combo).
Tip #4
Adjust your foot pressure if you can. This helped a ton, and I found myself changing it constantly with all of the different heights.
Also about here is when I started struggling with switching between the piecing stitch length, top stitch length and basting stitch.


I would finish something and then realize that I had used the top stitch length (which is longer) or the basting stitch (very much longer). So I found myself having to stitch things twice a lot.
Okay not every time so really if my bag falls apart in 2 months it is completely my fault.
Next I moved onto the fun part, sewing it all together! Which was equal parts terrifying and exciting.
I’ve never pushed my sewing machine to go through that many layers and I definitely broke at least one needle.
So the last tip would definitely be..
Tip #5
Go slower than molasses when you’re sewing. If you want neat top stitches, go slow.
If you want nice curves that you don’t have to redo like me, go slow! Some of it you can bomb through but the majority required a very precise, slow stitch.

After sewing the bag together (leave the zipper open! Leave a hole in the lining to flip!) honestly it was so magical turning it right side out.
That is of course until I cut my finger because I had accidentally SEWN A PIN INTO THE LINING.
A little surgery did the trick (and my husband didn’t even help, I would have been a great doctor).

And then just to be extra I made some little handle covers, which were just two rectangles folded in half (with foam on one side) sewn together and then flipped right side out, hook and stitch added to two sides and then popped onto the handles!
Overall, I cannot believe I made this bag. I had so much fun (okay not the whole time if I’m honest, don’t sew over the tape!!!!).

I hope you enjoy making your own duffle bags!!!
It’s a perfect way to celebrate the upcoming holiday season of travels and of course the birthday of Missouri Star Quilt Co, which partnered with me on this project, Happy birthday Missouri Star!


3 comments
Beautiful, love the bay will be on my to do list.
Jessica,
I love how your bag turned out! Definitely worth the effort.
I recently made a sling purse/backpack thingy and also had many issues (fabric upside down, strap between lining and bag, no zipper foot…). Encouraging to know even professionals have problems!
———
Quiltd Studios replied:
Oh my goodness it was definitely outside my comfort zone, but I suppose I learned a lot so it was worth the effort!
What did you use next to the cork on the bottom of the bag that your feet also went through? Is it acrylic or some kind of plastic?
Thanks!
———
Quiltd Studios replied:
Great question, it’s a super firm batting type material, like thick fabric cardboard and then over that is bag making foam, I believe you can find it at Sallie Tomato’s website or at Missouri Star Quilt co.